Friday, February 07, 2020

Scrap bag sampler - week 5 - four in a row block


Dip your toes into fussy cutting and EPP with this hexagon block designed by @cotefleurie


Materials: 

7 x 3 inch background fabric

Assorted scraps for hexagons

Template plastic

Water based glue stick


Make a plastic template of the ¾ inch hexagon shape. Note that the template does not include seam allowances. Free hexagon templates are available to download from www.moxyideas.com


Choose your fabric for the hexagons. If you wish to fussy cut your fabric, choose the motif or pattern you wish to highlight and place the template accordingly on the WS of the fabric. Draw round the template and then cut out the hexagon, being careful to add ¼ inch seam allowance all the way around.
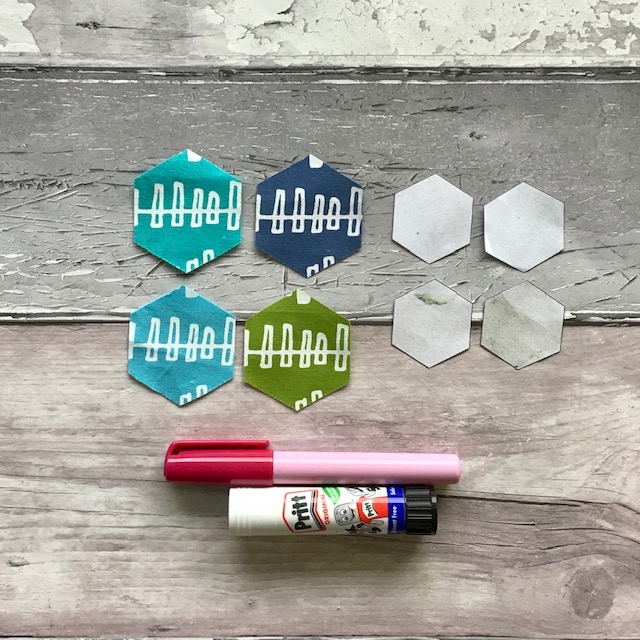


Cut out 4 paper templates using the plastic hexagon template. No seam allowance needs to be added to these paper templates.


Glue baste the hexagons. Place the paper templates on the WS of the fabric hexagons making sure they are centred. Put a thin line of glue on one outside edge of the paper hexagon and fold the fabric seam over to glue in place. Continue around the hexagon shape until all the edges of the hexagon have been folded over and glued. Leave to dry. If preferred the hexagons can be thread basted.


Decide on the layout of your hexagons and join them into a row of four. I use flat back stitch as shown by Karen at www.thediyaddict.com but whipstitch can be used if preferred. Try not to sew through the papers as this will make it more difficult to remove them.


Press the row of hexagons. Using tweezers, gently pull back the glued seam allowances and remove the papers. Fold the seam allowances back in place and press again on the back and the front, checking that the hexagons have not been distorted.


Centre the row of hexagons on your background fabric and pin in place. Using thread to match the hexagons, hand appliqué in place using fell stitch/appliqué stitch: bring your needle up through the hexagon fabric very close to the folded edge, then back down into the background fabric right next to the folded edge, making a tiny stitch. Bring the needle up again through the hexagon fabric approx. ⅛ inch further along. Repeat until the hexagons are stitched in place, making sure that the points of the hexagons are secured and that any excess fabric from the seam allowances is tucked under before stitching in place.

If preferred the hexagons can be appliquéd in place by machine.

Press the finished block and trim to 6½ x 2½ inches.
       

************************************************************************
I love Sue's block and was lucky enough to have these stars to fussy cut from Elizabeth Hartman's range of fabrics. I am pleased with how this block came out as I don't usually gravitate to hand sewn projects. It's also lovely to have a non square block for a change. I made just one of these bocks for my sample bag.


Visit our designers on Instagram to see their versions of this block : @cotefleurie @getahashtagkim @JustSewSue @lisasew @metroquilter @picosailors @pippaspatch @quirkyhannah  @surfseasew @therunninghare

#scrapbagsampler

Thursday, February 06, 2020

It's February

And I didn't even share my plans for January. We had six days in london for my hubby to have an op and preassessment so that threw a spanner in the works. So I am now ready to hit the ground running in February.


My plans are:
1. Finish the Carolyn Friedland tote as that was the number chosen for the JMQG challenge

2. Finish QP BOM which just needs the binding sewn down


3. Finish stash buster quilt for donation to Quilts 4 Care Leavers - quilt top put together and ready to quilt.

4. Finish Prairie schooler 2109 Santa

5. Start and finish Prairie schooler 210 Santa

6. Make a Luna Lapin - deadline - 15 February

7. Keep up to date with the Bloomtopia sewalong

Tuesday, February 04, 2020

FQS bloomtopia sewalong

Release 1 of the Bloomtopia stitchalong with Fat Quarter Shop in aid of Make a wish was released on Friday. I stitched this up as part of #saturdaynightcraftalong. Priscilla of The real Housewives of Cross Stitch said on her latest video that it took her 30 minutes. I must be a VERY slow stitcher.


I kitted this up from stash and where I didn't have the specified DMC, I substituted with what I had. The linen is also from stash. I like that this is a downloadable pattern which I can save to ibooks and enlarge to see the pattern closer. The stitchalong is also in manageable chunks.

Friday, January 31, 2020

Scrap Bag Sampler week 4 - HSTs


Half Square Triangles @Metroquilter

Those who follow me on Instagram know I love half square triangles. I’ve tried lots of methods over the years but the method I prefer is to chain piece my triangles and then trim to size. Other methods include a) foundation paper pieced -which I find accurate but fiddly b) piecing to size without trimming - never worked for me! c) 4 in 1 - lots of bias edges and still have to trim.

We are going to make four 2.5inch half square triangles, with the final piece being 4.5inch square. 


 Requirements 

(4)  3 inch squares from your scraps 

Instructions
Step one:  Place two squares right sides together. You will have two sets of two.
                                                               
Step two: Cut once from corner to corner on the diagonal. This will give you four sets of triangles. (You may want to mix the triangles up to ensure all four of the finished half square triangles are different. Just remember that the triangles need to be right sides together).
                                                               
Step three: Chain piece the triangles, using a quarter inch seam allowance. Snip the threads between the triangles.
                                                               
Step four: Press each of the seams to the dark side. You will now have four half square triangles ready for trimming.         
                                     
Step 5: With your ruler align the 45 degree line with the diagonal of the block. Ensure that a 2.5 inch square can be made and trim the first two sides of the block.

Step 6: Turn the block 180 degrees and again with your ruler align the 45 degree line with the diagonal of the block. Keep the ruler square with the two sides you have already trimmed, and trim the remaining two sides to make a 2.5 inch square.    
                 
Step 7: Arrange your four trimmed blocks as desired into a square arrangement.                     
Step 8: Sew the top two blocks together and the bottom two blocks together using a quarter inch seam. Press the top and bottom set in the opposite directions. Place the two sets of two blocks right side together, nesting the seam. Sew together using a quarter inch seam.    


Step 9: Press the seams and you’re finished. The finished block will be 4.5 inch square.          
************************************************************************
I was lucky enough to have some Half square triangle units left over from the perfect HST BOM, so I used them to make this block. Cheating ? Definitely not, just using up my scraps. There are no rules in this sewalong:)


Visit our designers on Instagram to see their versions of this block : @cotefleurie @getahashtagkim @JustSewSue @lisasew @metroquilter @picosailors @pippaspatch @quirkyhannah  @surfseasew @therunninghare

#scrapbagsampler

Friday, January 24, 2020

Scrap bag sampler - week 3 - two tone wonky stars


Two Tone Wonky Star Tutorial – 6 “ finished @quirkyhannah


Today we are going to make a variant of the wonky star. Do you have lots of little pieces of offcuts hiding in your stash bucket? These will be perfect for the star points.


If you don’t fancy doing a little star or two tone- see here for variants on the pattern including upsizing to 12” finished, using one fabric or even offsetting your stars!

Materials:


      -          1 x 2.5” square (centre)

-          8 x 2.5” square (background and star points)

-          16 x 1” x 3” scraps for the star points


Tip: Due to the smaller pieces involved throughout the stages when pressing between each step I would recommend finger pressing or using a seam roller to avoid distortion of the seams/fabrics. Once the block is assembled press using an iron to set the seams and ensure a smoother look.


Tip: Some of you may prefer longer or fatter stars in which case adjust the size of your strips by ¼” to ½” either in length or width.


Method


1 – Take a background 2.5” square and the rectangle piece to be the outer point of the star. Lay it right side down on top of the square on the top right side. Changing the angle of the way it is laid down will affect the wonk of the star point. As a guide I normally start it about half way across the square when you stitch. Ensure both ends of the strip extend pass the square.

Trim down to a ¼” seam then press the strip away from the background.


2 – Lay the second strip on top of the first, ensuring both ends of the strip are extending pass the square and sew along it. Press away from the background.


3 – You are now ready to work on the second side. Take the outer point strip and like the first point lay it at an angle across the top left side of the square.  The strips can overlap with the right pair at the bottom or there could be a gap- each variation affects the wonky point, just ensure the strip extends pass the square at both sides.


Sew the strip, then trim the excess fabric down to a ¼” seam. Press the strip away from the background.


Tip: If you would like your star points to be more pointy (i.e. can’t see the join of both sides, ensure that when you place the second section, the part where they overlap on the sewn line is ¼” or less from the edge of the block.


4 – Take the inner star point strip and lay it across the opened strip, ensuring it extends pass the square. Sew and press the strip away from the background.


5 – You are now ready to square up your star point! Trim the piece down to 2.5” square.


6- Repeat this 3 more times to have 4 star point squares,


7- Lay out your star points, the centre fabric and background corners in your desired layout of 3 x 3.


Sew each row separately and press seams to the side. For the top and bottom row press the seams away from the centre square (star point). Then the middle row press seams towards the centre. This will help the seams sit together (nest) for a flatter block.


Sew the rows together and as the seams on each row have been pressed to alternative sides, it is easier to line the rows up as the seams sit neatly next to each other. Your block is now done!


Don’t forget to use the hashtag #scrapbagsampler on IG to show us your version or one of the variations. 


***************************************

I love this block and have never sewn anything like it before. This is my version. Guess who forgot to take a photo before quilting the panel ready to make the bag! Never mind.


Visit our designers on Instagram to see their versions of this block : @cotefleurie @getahashtagkim @JustSewSue @lisasew @metroquilter @picosailors @pippaspatch @quirkyhannah  @surfseasew @therunninghare


#scrapbagsampler

Friday, January 17, 2020

Scrap bag sampler week 2 - strippy curves


STRIPPY CURVES WITH @getahashtagkim


Don’t be scared, curves aren’t as tricky as you think!  Try this easy, no-pin way of making gentle improv curves. The Scrap Bag Sampler SAL is the perfect opportunity to give it a go, as we’re using scraps and making random blocks.

Cut four 9½ x 2½ inch strips. Lay four 9½ x 2½ inch strips in your chosen order.


Then take two strips and overlap them by about an inch as shown with pin markers. 


Using a small rotary cutter, cut through both layers where they overlap, making small curves. Go slowly to avoid shifting the two strips, pin them together at the far end if it helps. Discard the narrow scraps & admire your hills & valleys! Cut and sew each pair of strips one at a time to ensure the curves match. Those straight sides in the middle will be cut and sewn later.
Take one pair & sew along the curvy edge RIGHT SIDES TOGETHER using a narrow seam allowance, 1/8th inch is easier than trying for a normal ¼ inch, in my experience. You don’t need pins, trust me! Just go slowly, carefully lifting & turning the top layer as you go to align the edge with that of the bottom layer. Don’t pull or you’ll stretch the fabric. You may only manage a couple of stitches at a time before you have to leave the needle down & raise the foot to work around the curves and wriggle the fabrics but it WILL work. It’s trickier to explain than it is to actually do!  (Maybe I’ll be brave enough to post a video)  


Yes, I know it looks a mess right now but it will press flat, if you go slowly. Lay one strip flat on the ironing board, hold the other one up and gently nudge the tip over the iron along the seam allowance to press it over to one side.


Overlap then cut the remaining straight sides as shown earlier. Sew & press as before. Give the block a final press, with a blast of steam, then trim to a 4½ x 8½ inch block. Look forward to seeing
your curves!


This is a deceptively quick block to put together. I cut the block into a 4.5" square for the SAL bag. I suggest keeping it as one large unit until you decide on how to position your blocks.


Visit our designers on Instagram to see their versions of this block : @cotefleurie @getahashtagkim @JustSewSue @lisasew @metroquilter @picosailors @pippaspatch @quirkyhannah  @surfseasew @therunninghare


#scrapbagsampler