Friday, February 28, 2020

Scrap bag sampler - week 8 - wonky crosses


Wonky Cross Block by @therunninghare


This block may be simple but it is extremely versatile. Firstly, it can be any size, and need not be square although square and rectangular blocks are the most common. It can be made as a plus (+) or a cross (x) and the strips can be thick or thin and multicoloured in a variety of ways.

To make the block:

1. Cut a square slightly larger than the size of your unfinished block (as our blocks are 2,4 or 6 inches finished then that would be 2.75, 4.75 or 6.75 inches)

2. Make a cut using a ruler and rotary cutter in one direction on your square. 

3.  Insert and sew a strip of contrasting fabric between the 2 halves of your square. Press to the inserted strip.


4. The strips can be any width but smaller than ¾ inch is harder to sew  and wider strips ( more than 1.5 inches) are only suitable for bigger blocks. A good size to cut is 1.25 inches for these smaller blocks. Strips can also be tapered so that they are thinner at one end to give a different look


5. Make a cut in the opposite direction and insert another strip of fabric between the 2 halves. Depending on your preference, you can line the cross strip up on the two halves exactly or leave it not matching to give a slightly staggered effect

Press to the inserted strip.

6. Trim your block to size.


Interest can be added by adding flashes of colour to the strips- see photos of different types- stripes, middle squares in the cross etc  The photo mosaic shows a variety of different blocks of this type


**************************************************

Carol is right, these are very quick but versatile blocks. I used one 2" and one 4" finished block in my bag pattern


Visit our designers on Instagram to see their versions of this block : @cotefleurie @getahashtagkim @JustSewSue @lisasew @metroquilter @picosailors @pippaspatch @quirkyhannah  @surfseasew @therunninghare

#scrapbagsampler


Friday, February 21, 2020

Scrap bag sampler - week 7 - pop goes the weasel


‘Pop Goes the Weasel’ - @picosailors


You will need:
Assorted 3” scraps:
Four for the middle convex, four for the outer concave pieces
(Four border strips:  Two 1.5” x 4.5”, two 1.5”x 6.5”)
Template

Print your template here Using your paper template cut out your first quarter circle block. Use this as your template for the next three, (if you are fussy cutting) by placing it on the fabric and drawing around to get exactly the same pattern position.
Cut four outer concave pieces.


Pin your concave block to your convex block at your starting point.

Sew together easing the block round without stretching.

Keep the concave block on the top.

(Don’t worry if they don’t quite meet at the end as you have plenty of wiggle room when you trim)


Snip the seam to help it lie flat.

Open the seam using your thumb nails to press it.

Iron it well, I like to use steam.

Make all four blocks

Trim to 2 ½ ” square.

(Make sure when you trim that you have at least a quarter of an inch at the end of the outer fabric and they are all trimmed the same so they match up.)

Sew your blocks together in pairs then into four, carefully matching all your seams.

Trim your block to 4 ½”


If you want a larger 6 ½” block add a 1 ½” border to each side.

Voila! And there you have it!

Note on templates: I have some acrylic templates from @pappersaxten which are very useful if you plan on making lots of these blocks.


************************************************************************

Thank you Jane for your block. I love the fabrics. And here's my 6.5" block , however I used one of the 4.5" block for my bag.


Visit our designers on Instagram to see their versions of this block : @cotefleurie @getahashtagkim @JustSewSue @lisasew @metroquilter @picosailors @pippaspatch @quirkyhannah  @surfseasew @therunninghare

#scrapbagsampler

Wednesday, February 19, 2020

WIP Wednesday


We are over half way through February and I thought it was time to review my progress for the month.


My plans were:
1. Finish the Carolyn Friedland tote as that was the number chosen for the JMQG challenge  Done


2. Finish QP BOM which just needs the binding sewn down  Also done


3. Finish stash buster quilt for donation to Quilts 4 Care Leavers  Also done - what?


4. Finish Prairie schooler 2019 Santa. In progress as I have just the sheep to stitch and that's white which I loathe.

5. Start and finish Prairie schooler 2018 Santa, well I started and am about 75% complete on the 1987 Santa, does that count?

6. Make a Luna Lapin - deadline - 15 February - Bunny made but the clothes are challenging me.

7. Keep up to date with the Bloomtopia sewalong - Yes, as you can see above, part 2 is complete.


Monday, February 17, 2020

February finish - Squad Ghouls


This is Squad Ghouls by The Frosted Pumpkin Stitchery which was number 10 on my list of 12 UFOs for the Jersey Modern Quilt Group and APQS challenges in 2020. The number wasn't chosen for either of the challenges but I decided to start the fourth vignette of the little vampire for when the number was selected. However the recent stormy weather coupled with my hubby being at home, it was soon finished.

If you guessed that I am avoiding working on other projects, you'd be correct. I needed to finish Luna lapin for our Group meeting on 15 February, a tote pattern (now done) and bind another tote. None of them big projects but I was in avoidance mode.


As you can see I framed them myself using four frames purchased for the project at Michaels in Boston. Not bad for a first attempt to finish my own project.

I also started another Prairie Schooler Santa (1987) as the 2019 Santa has lots of white and that's about all I have to work on to complete the project. 1987 Santa isn't even on my list for this quarter. I need to focus and I can finish Luna, the tote binding and the 2019 Santa with not much more work. Wish me luck on keeping focussed.

Sunday, February 16, 2020

Sunday stash - 16 February 2020

On Monday I woke early so snuck downstairs to watch some Flosstube and work on my cross stitch. I also managed to sign up for Satsuma Street’s Alice in wonderland secretstitch along. A new stitchalong needs a themed project bag too so I hopped on the internet and googled for Rifle Paper Company’s wonderland Range. Perfect for what I had in mind but difficult to find.


In the end I placed three orders for fabric and fixings to make a bag at Jersey Modern Quilt Group yesterday but not all of the items arrived so hopefully I will get it made some time this week. I ordered:
  • Navy Alice fabric from Lovely Jubbly which arrived on Tuesday
  • White fabric from The Homemakery which was despatched on Thursday
  • By Annie vinyl and zipper tape from Sew Hot which arrived on Wednesday
I was able to pick up all of the DMC colors locally so I hope to be all kitted out by the end of the week.

Not bad really when storms Ciara and Dennis have been raging and boat have been cancelled. One of the features of living on a small island.  I also still have to arrive some linen in two shades of blue from Ebay and a doll stand for my Luna Lapin also from Ebay.


Friday, February 14, 2020

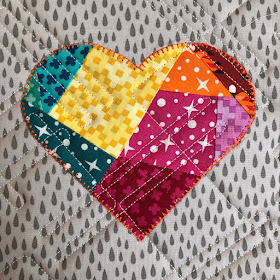
Scrap bag sampler - week 6 - crazy hearts


Heart block @pippaspatch

It's my turn to post a block in our super scrappy scrap bag sampler. I've chosen an improvised/crazy heart. It is Valentine's day after all, what else could it have been.


I'm not an improv quilter and I really like following a pattern but when my scraps build up I make scrappy improv shapes and I've been known to make them into Valentine's cards or quilt blocks. Stars/Trees/Easter Egg's the principle would be exactly the same.
Gather scraps together and cut the background square.
I like to cut my block down at the end so for the 6” block cut a 7” background.    
Put two fabrics right sides together, you can make them wonky or straight depending on  your mood. Sew a 1/4” seam allowance ideally in matching thread. Trim any extra fabric in line with the seam, open then press. 


Choose another piece of scrap to add. Here I've cut  the main piece at a slant so that the third fabric will be at an angle.  Once again put the scrap your adding right side together and sew 1/4” seam. Unfold and press.
For some added fun, you can join small scraps together in the same manner and join it to the main fabric. Continue in this way until you have a fabric piece the size of the heart you want.  For the 6” block I think a 5” heart works well.
I like to use fusible webbing/interfacing for my applique. You can either freehand draw a heart or use a template, if you have a sizzix or a die cutter they make great templates just cut them in cardstock.Draw the shape onto the non shiny side (the non glue side) of the interfacing.


Use a light box or hold the heart up to a light source, lamp or window and just check that the scrappy fabric has a 1/4” allowance around the drawn heart.


Sew directly on the drawn line, I use a 2mm stitch and I start on a straighter side and always backstitch at the beginning and the end. Cut around the heart leaving a 1/4” seam allowance, clip into the corners and the V do not cut through the stitching. Carefully lift up the interfacing and slit a cut into it so that you can turn the heart right side out. Turn and carefully push corners and curves out. DO NOT IRON

Grab your background square, fold it in half and align your heart on the right side of the fabric. I also like to be a bit wonky when I'm doing these and the quilt police won't get us if they aren't straight.  


Now is the time to get busy with the iron, gently press and the fusible interfacing will stick the heart to the background. To finish the block you could leave it as it is, especially if the item isn't going to be washed much, you could blanket stitch it by hand, try some hand embroidery which is what is generally done here in France, lots of elaborate stitches in multiple colours, perhaps use some ribbons or lace or just get busy with those fancy stitches on your machine. Then trim block to desired size, in my case 6 1/2"
On the little block I used some 12wt Aurifil and stitched a rough 1/8” topstitch inside the heart. This one is a longer "country style" heart and was freehand drawn. The large heart I used a blanket stitch and then lots of different embroidery stitches on my machine using Aurifil 50wt.

As you can see this method is really versatile and great for using up your scraps of any colour and any size.  There's no limit to the number of colours on each block, the number of scraps, threads or stitches. Next week's block is a really fun one.


************************************************************************
Hmm, I went rogue on this one. I got as far as the instruction to grab a Sizzix die, and cut the fabric. Never mind, it still looks great. Thank you Pippa, I am not an improv girl but it seems I don't follow instructions well either.


Visit our designers on Instagram to see their versions of this block : @cotefleurie @getahashtagkim @JustSewSue @lisasew @metroquilter @picosailors @pippaspatch @quirkyhannah  @surfseasew @therunninghare

#scrapbagsampler